Let’s Go Surfing with AutoCAD Electrical

This is one of the top 5 tools in all of my AutoCAD Electrical presentations. I can't tell whether it has been voted so high because of the commands ability to save time or its pure coolness.

What does this command let us do? Well the simple description is this. It allows us to move from reference to reference across the project drawing set. Sounds simple right, this saves a ton of time when working on a big project. It also lets us move from the reports we can run inside of AutoCAD Electrical back out into our project. A great example when using the missing bill of material report, we now can find those missing items in seconds within our project.


Surfer Special Codes in the List Box
Notice the arrow pointing to the Type Column. This column informs the user of what type of item is being displayed on each line of the surfer list dialog box.


C - Component Symbol
P - Parent or Standalone Schematic Symbol
T - Terminal
W - Wire Number
# - Panel Layout Symbol
# np - Panel Layout nameplate reference


By understanding these codes you will be able to easily "surf" to the correct item you are looking for, saving time and effort.

Let's take a look
http://www.screencast.com/t/SWU1uobuu
Created by Dave one of the Cad Geeks


Autodesk IT Toolbox website

Many of us here at INCAT work with IT Managers frequently when discussing Autodesk products. So recently we did some surveys and phone interviews to discuss the needs around CAD IT related topics. Based on this feedback we have launched a new website "Autodesk IT Manager Toolbox"


Be sure to check it out, and give us your feedback.


Kevin with the INCAT CAD Geeks


Getting the Details Right


One of the great tools inside of AutoCAD Mechanical is the ability to create "Detail Views" that are intelligent.

When I had to add one of these in the old days of AutoCAD, I always worried. Did I get the dimensions the right scale, did anything change in the parent view.


When I made the change to AutoCAD Mechanical I found the tool I wanted for so many years.

Check out my video that shows both ways of making a view below.

Enjoy the tip,
Jim ........Another INCAT CAD Geek!

Delete Permissions in Vault or ProductStream


Every company is concerned about safeguarding their engineering data, and both Vault and Productstream allow control over exactly who has the ability to delete files and folders. You may have Power Users in charge of cleaning up unnecessary Vault data, and will therefore need Delete permissions. Other daily CAD users may be a little too quick with the delete function, and this is something that might need to be precisely controlled. Take a look at this short video for a look at the different Vault roles that determine who can delete.

Contributed by Ben of the INCAT CAD Geeks


Creating Drawing List Reports

Today I will talk quickly about Drawing Index pages using AutoCAD Electrical.


This can be an easily overlooked topic in AutoCAD Electrical considering most people would think it would be a report that they would run, and they don't find it there. Don't worry, it can be done. Have the project you would like to run it on active and the drawing opened that you would like the index placed on. You will then right click on the project file and click on "Drawing List Report". Follow the steps below and adjust where needed to fit your specific needs.


  • Click on New Report

  • Select the drawings to process, then click OK

  • Modify the report format as needed.

  • Place on the drawing.

A whole lot easier than creating the list manually

Let's take a look


Created by Dave one of the Cad Geeks

2D FEA - Get results from your designs


On this episode of the AutoCAD Mechanical CAD GEEKS....

We find Jim in a STRESSful situation. He has a design that has been in the field for a while and works pretty well, but now he needs to create a new version and test it out.

In the old days that meant designing one up and having it built for the sole purpose of breaking it and recording forces.

Since his company has gotten with the times and updated his regular AutoCAD to AutoCAD Mechanical he has power at his finger tips. This comes in the form of mechanical calculators.

Check out this great video on how he did his new design FEA.


Enjoy,
Jim.......Another INCAT CAD Geek!

Controlling Vault Prompts - Streamline your Data Management interface

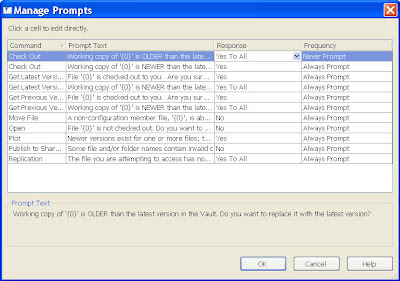
When I am showing customers how Vault and ProductStream function, I typically show the interface, dialog boxes, and prompts like they are when the software is installed. If I were using Vault in a production environment, I would usually always have the same response to dialog boxes and prompts. It is now possible to completely streamline the Vault interface so that a CAD user might not even know they are checking files out and back in to Vault. Just take a look at the Vault Options available in the CAD Application and it could improve your workflow as well.

Contributed by Ben of the INCAT CAD Geeks


Autodesk Inventor Team Web


This is an introduction to the Team Web option in Autodesk Inventor. In this technical twister, we'll look at a simple way to create a web page that utilizes Autodesk's i-Drop technology to insert parts easily into your assemblies as a collaborative team. You can follow the directions from the Help Menu by typing "Team Web" or you can watch this video.


John with the INCAT CAD Geeks.

AliasStudio - The Aspect Ratio Tool


This useful little tool hides in the Viewing Panel. It allows you to manipulate the active modeling window to view you data in some very useful ways.

Check out the video here...
http://www.screencast.com/t/3gkR15rnl

Created by Aaron... your Alias CAD Geek!

Changing All Wire Numbers to Fixed

Welcome Sparky's,

If you currently own AutoCAD Electrical today or thinking about making the move to AutoCAD Electrical you can now look forward to tips and tricks being added to our Incat Cad Geek Blog Site. I look forward to sharing my knowledge with you. If your looking for information about the product please let us know and we will be more than happy to get the answers your looking for. Now lets look at our first topic.

I have a few customers that like to mark all their wire numbers as "Fixed" after the project has been built. This way if and when any design changes come in the future, they don't accidentally forget. This would be a bad thing since the machine is built and already has wire numbers on it in the field. This is a pretty easy task.

Steps

1. Click on the "Project" pull down menu then click on "Project Wide Utilities".
2. In the "Wire Numbers" area of the dialog box select "Set all wire numbers to fixed".
3. Click "OK"
4. Select the "Project" radio button.
5. Click "Do All"
6. Click "OK"
Watch AutoCAD Electrical do your work for you. This software is a must for anyone doing Electrical designs.
Let's take a look
http://www.screencast.com/t/8CV5JGol0M2
Created by Dave one of the Cad Geeks

2D Shafts with AutoCAD Mechanical


Realizing there are a lot of companies still using 2D today, I want to help add some tools to their bag of tricks.

The best tool available for the 2D machine and tools designer is AutoCAD Mechanical. It has tons of features that I will be highlighting in the future.

One of the really great tools is its "Shaft Generator". This tool can make designing a complex shaft a snap.


I hope this post will allow you to see how much more you can strat doing in 2D besides using plain old AutoCAD.

Enjoy,
Jim...........Another INCAT CAD Geek!

Change Impact - What happens when you don't know?


One of the common impediments to manufacturing change is the ability to determine what will be impacted if a component is changed. Has it been used in other designs? Has another co-worker used it in their designs. Can a change be made that may impact the function of another design different than the current one I am addressing. Change Impact awareness can rapidly determine if new part numbers need to be created for the application at hand. Take a look at this video for an example of the Impact Analysis tools in Autodesk Vault and ProductStream.


Contributed by Ben of the INCAT CAD Geeks

Inventor Save Image Options


One of the least used iProperties tab would have to be the Save options. Inventor allows you to change the way it saves the bitmap upon saving a document. From the help menu, there are five options:


Save Preview Picture
Saves a thumbnail image of the model so that it appears on the File Open dialog box. The default is On; clear the check box to turn Off. To select any remaining options, this option must be selected.


Active Component Iso View on Save
Zooms out and captures an isometric view of the component before saving it.


Active Window on Save
Sets thumbnail image to the view in the graphics window when the file is saved.


Active Window
Click Capture button to set thumbnail image to the view in the active graphics window.


Import From File
Imports thumbnail BMP image from a file. Click Import button to browse to the file containing the image. Image must be 180 x 180 pixels.


Let's take a look at the options in this short video....


How to pull surfaces from curves of an existing surface in AliasStudio


1. Choose Surfaces > Draft surfaces > Draft/flange in Flange mode.

2. Click the isoparametric curves, edges, and/or curves-on-surface, then click Go.

3. Do any of the following:

  • Use the manipulators to adjust the draft surface.
  • left mouse button-click a point on one of the original curves to add another angle/depth manipulator.
  • right mouse button-click an angle/depth manipulator to delete it.
  • Click one of the handles, then drag left or right to change the parameter, or type a number.

  • Animating Positional Reps with Studio

    One of my team members did a post awhile back about using animation inside studio with Inventor Pro Simulation. Not every company has a version of Pro so I want to show how you can have animation inside the studio environment using positional representations. This is only one way of adding animation into your studio environment.


    Let's take a look
    http://www.screencast.com/t/jjxIYISoG

    Created by Dave one of the Cad Geeks

    iParts to iFeatures - Bonus Tools 2009


    One of the Bonus Tools added to Inventor gives you the ability to take an iPart and quickly turn it into an iFeature with the table.


    This could save you a lot of time in adding a multi-function iFeature to your catalog.


    Enjoy the new tools,

    Jim.......Another INCAT CAD Geek!

    Bonus Tools For Inventor!!!


    Autodesk® Inventor® 2009 Subscription Bonus Pack continues focus on user productivity!

    The first Subscription Bonus Pack is now available featuring improvements to frequently used commands. In fact, three of our current AUGI Top 10 wish list items are provided along with many other productivity based improvements for part and assembly modeling to drawing creation. Tools included in the Bonus Pack will reduce the amount of picks and clicks as well as reduce editing steps which will delight our customers. Our subscription customers will be able to install these tools to their current Inventor 2009 after downloading a small file from the subscription portal and these same tools will be rolled into the next release of Inventor.

    What’s in it?

    Drawing Manager Tools

    Arrange dimensions
    Dimension Selection Filters
    Directly open a corresponding drawing right from a part or assembly
    Refreshing drawing parameters
    Balloon snap and alignment on placement
    Project geometry works like part environment
    Edit dimension upon placement

    Part Modeling Tools
    Create parameters on the fly when dimensioning
    Specify iFeatures normal direction
    Create iFeatures from iParts
    Apply buttons on Scale and Rotate dialogs
    Simplified loft selection through right click context menu


    Assembly Design Tools

    Bill of Material Editor
    Shift or Control for contiguous or non-contiguous selection
    Copy/Paste
    Capitalization
    Find and Replace
    Cross highlight from the BOM editor and Assembly model
    Auto Save Reminder


    Where can they get it?

    Our current Inventor subscription customers will be able to log in to the Autodesk Subscription website and download the small Bonus Pack.


    Here is a Video of a Couple to wet your appetite:


    Enjoy,

    Jim...........Another INCAT CAD Geek.